Thursday, 7 September 2017

Courgette and Smoked Paprika Pastry Rolls

Perfect as a starter, a tea or a buffet, these mouthwatering rolls are seriously easy to make. With a few ingredients and zero cooking skills, these tasty little bites will need just around 15 minutes prep plus 15 to 20 minutes in the oven. You can even prep them in advance and store the roll in the fridge before cutting and baking it.
And there they are: gorgeus and ready to be devoured :) .


Ingredients (make 30ish rolls):
1 Puff Pastry Sheet
100 gr Vegan Spread Cheese 
1 Courgette, grated (or 2 small)
Smoked Paprika, Salt and Pepper to taste

Method:
Microwawe courgette with a little salt for 7 minutes at 750-800 W.


In the meantime unroll puff pastry...


 ...and spread over an uniform layer of "cheese".


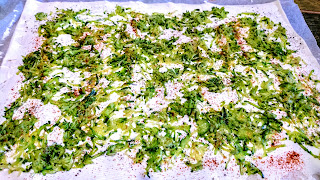
Once courgette is cooked, spread it on the cheese layer and season with some pepper and paprika.


Roll up the pastry as shown in the picture below...


...stick the end and cut pieces of around 1 centimeter. (If you need to store them in the fridge make sure to wrap the entire roll in some film before cutting it. This way it can last up to 2 days.)


Arrange bites on a baking tray making sure there's at least 1 centimeter between each one (to prevent them sticking together after they puff out) and bake at 180° for 15-20 minutes.


Rolls are perfect both warm or at room temperature.


Thursday, 17 August 2017

Vegan Aubergine Lasagne

It probably is because of my Italian roots but the fact that I love lasagne is a sure thing.
You won't believe me if I say that this is the first time ever I tried a version with aubergine as the only filling.. and that turned out pretty good I must say!

Ingredients for 6 (or greedy 4) servings:
12 Egg-Free Lasagne Sheets
2 medium Aubergines
1 Onion
10 to 15 Cherry Tomatoes*
350 ml Italian Passata*
Onion Powder
Garlic Powder
1 Garlic Clove
100 gr Grated Mozzarella
Basil Leaves
Olive Oil
Salt & Pepper to taste
... for the Beschamelle sauce ...
500 ml Plant Based Milk (Oat)
30 gr Vegetable Oil
30 gr Plain Flour
30 gr Nutritional Yeast (Nooch)
1 ts Salt
1/2 ts Nutmeg

* you can only use 500 ml Italian Passata. I love to use both passata and fresh tomatoes because it gives the sauce a fresher kick.

 1) TOMATO SAUCE:
Roughly chop the tomatoes and place in a microwave friendly bowl with olive oil and salt to taste. 


Microwave for 3 minutes at 800 W.


Add passata, pepper, basil leaves, onion and garlic powder.


Microwave for 6 more minutes at 800 W.

2) FILLING:
Wash onion and aubergines. 


Chop and sauté the onion with olive oil, salt and a splash of water for around 10ish minutes. Than add the garlic clove, grated.


In the meantime cut the aubergine into cubes. Combine with the onion (once it became translucent) and cook for 10-15 minutes.


Turn off the heat and set aside.


3) BESCHAMELLE SAUCE:


Combine oil and flour in a microwave friendly bowl and heat for 30 seconds at 800 W.
Gently combine milk (a spalsh at a time), salt, and microwave for another 3 minutes at 800 W.
Stir with a whisk (sauce should be thickened a bit) and add the rest of the ingredients. 


Mix well and microwave for 3 to 5 minutes more. Blend one more time and set aside.

4) ASSEMBLING:

In a tray pour a few tablespoons of tomato sauce.


Place as many lasagna sheets as to cover the entire bottom.


Cover with a layer of aubergine (half of them) first...


 ...then pour some tomato and beschamelle sauce. Sprinkle some mozzarella cheese. Repeat another layer (lasagne sheets, aubergine, tomato sauce, beschamelle and mozzarella).


Top with some beschamelle and tomato sauce and do a little swirl with the back of a spoon.


Pre-heat the oven on 180° and bake for 40 minutes (pierce with a skewer or a fork to make sure lasagne is cooked thoroughly).

Enjoy :)

Aubergine Katzu Curry - Vegan & Gluten Free

Sometimes all you need is a warm and tasty treat, and if this treat is also both homemade and quick: BINGO!

This is the case indeed. You can make it even quicker using some breaded mock chicken, breaded vegan burgers or whatever you like will do :) 
Even "plain", with some jasmine or basmati rice is quite a thing. A real comfort food, perfect to be enjoyed after a long and tiring day at work.

The version I'm about to show you is with mouthwatering aubergine disks coated in corn flakes (because this is also a gluten free version - but if you don't need to avoid gluten you should definetely use panko bread instead, as in the authentic japanese version) and oven baked. 
Of course you can also fry the aubergine, but I preferred to keep it lighter this time.


Ingredients (4 servings):

1 Aubergine
1 Onion
1 large Potato
5-6 Closed Cup Mushrooms
1 cup of Green Peas (frozen in my case)
1 clove of Garlic
2 Bay Leaves
1 tablespoon of Tomato Purè
1/2 cup of White Wine (optional)
2-3 tablespoons of Curry Powder
1 teaspoon of Ginger Powder (fresh would be even better)
3 to 4 tablespoons of Gluten Free Flour
1 liter of Vegetable Stock
2 cups of Plant Based Milk (oat)
1 cup of Corn Flakes (crushed)
1 pinch of Tumeric
1 tablespoon of Olive Oil
2 tablespoons of Vegetable Oil
Salt & Pepper to taste

Method:

1) THE CURRY

Rinse and chop the vegs for the curry: potato, mushrooms and onion.
First sautè the onion for around 10 minutes with some olive oil and salt...


...then add the vegs and the green peas. 

Cook for a couple of minutes, add the vine and let it evaporate.
Now it's time to throw in: garlic (grated), bay leaves, tomato puré, ginger. After another 2 to 3 minutes pour in the broth, cover and simmer for 15 to 20 minutes, until the vegs are tender.


2) KATZU AUBERGINE
Wash and cut discs of about 1 inch.


In a bowl combine flour, salt, pepper and a pinch of tumeric. Add slowly some plant based milk until you reach a runny yet thick batter.


Pour the cornflakes crumbs on a plate and get ready to coat!


Dip the aubergine discs in the batter first, then coat them in corn flakes. Place onto a baking tray, sprinkle with some vegetable oil and bake at 180-200° for 30ish minutes, turning the discs halfway.


3) THE CHOUX
Choux is important to thicken the curry. You can buy it ready from an asian shop (though that's hardly gluten free) or you can easily make your own in just a couple of minutes.

In a pan combine 2 tablespoons of (GF)flour, 1 tablespoon of curry powder and 2 tablespoons of vegetable oil. Cook at medium heat for 2-3 minutes, until you reach the consistency of the last picture.


Once the vegs are tender gently pour the milk in the pan where the choux is, and combine until it's runny and lumpsless.


Combine the choux mixture with the curry and allow to thicken for some extra 3 to 4 minutes.
Serve hot with some steamed jasmine rice, aubergine discs and paprika.


Enjoy :)

Thursday, 10 August 2017

Vegan Mushrooms and Beans Burgers

Hello everyone! Today I'm very pleased to share with you this amazing burger recipe, 100% plant based.


For 6 Burgers:
8 to 10 Closed Cup Mushrooms
1 can of Mixed Beans
1 handful of dried Porcini Mushrooms
1 jar of Mushroom Paste (optional)
4-5 tablespoons of Gluten Flour (or chickpeas flower for a GF version)
1/2 Onion
1 clove of Garlic
2 tablespoons of Liquid Smoke (optional)
1/2 teaspoon of Curry Powder
1 tablespoon of dried Parsley
1 tablespoon of Olive Oil
Salt & Pepper to taste

Method:
Dice the onion and place it on a plate with olive oil, salt and a splash of water.

Microwave for 4 to 5 mins at 800 W.


Wash and roughly chop the mushrooms. Blend with a food processor and transfer in a bowl.


Drain and rinse the beans and pour them in the blender. Add the onion, the garlic and the dried porcini mushroom (after soaking them in water for 10-15 mins)


Blend for a few seconds then add some liquid smoke for extra flavour.


Transfer the bean paste in the bowl with the mushrooms and combine the extra mushroom paste together with all the spices (curry, nutmeg, parsley, salt and pepper). Mix well then add some gluten flour.


Please note that the quantity of gluten may vary depending on how wet your mixture is. Make sure you achieve the consistency below :)


Allow the mixture to set for at least a 10ish mins. 
Now it's finally time to shape the burgers!
I usually use two plastic containers: easy peasy job that helps you straightforwardly achieve the perfect burger shape!

You only need to cover the first container with some film, pour a couple of tablespoons of mixture on it, and squeeze it down with the bottom of the second container.


Et voitlà! The burgers are now ready to go in the oven at 180° for 25-30 mins.


Once they're cooked you can eat them straight away or (recommended) fry each side in a pan for a couple of minutes before enjoing them in your favourite buns, or plain with a rich side salad :)